Creating Maps
Your own maps are added to your Home Page or one of the other Pages you created.
To create a new map first go to the page on which you want the map to be published
Create a new Map
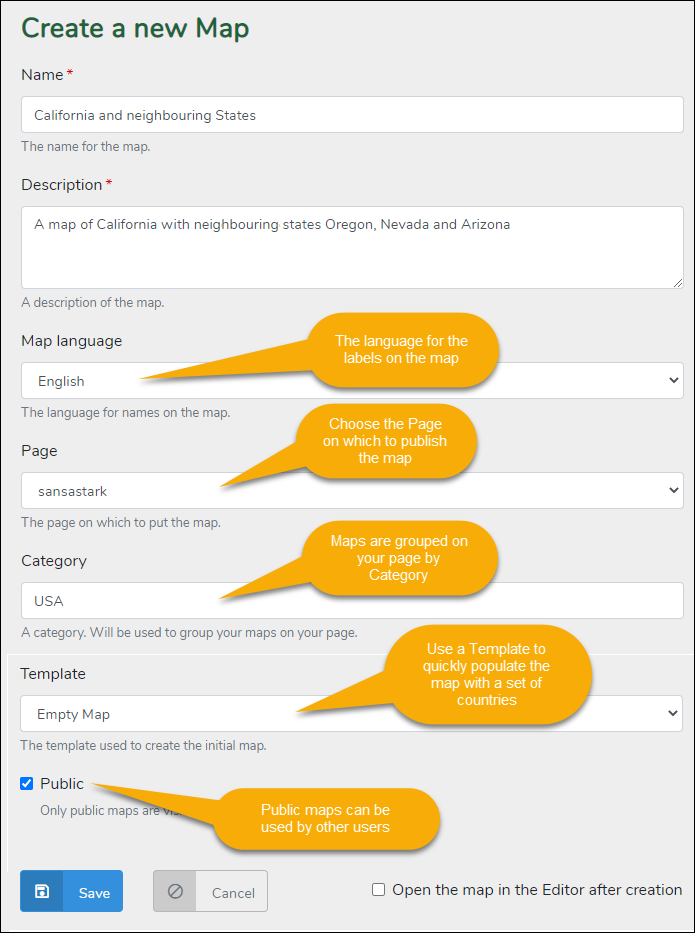
On your page you see a link New Map. Click on the link to start creating a new map. First fill out the details about your map:

Name and Description
The Name and Description are mandatory fields for your new map. The other fields are optional.
Map Language
The Map Language determines in which language the labels of your map will be shown during the exercises
Category (optional)
Maps will be grouped by Category on your page
Template (optional)
You can start your map as a empty map, or you can choose one of the predefined Templates.
Public
If your map is set to Public, all other users can find and use your map. Only you can edit the map.
Save the Map and start the Map Editor
Once you have completed the form, click on Save. Your new map will be created and shown on your page.
When you just created a new map, the map will show up with a default image on your page. After you edit the map in the Map Editor it will get a definitive image.
On the right side of the map image on your page you see a couple of links. The first link is Edit, this link will show you the page where you can edit map details like Name and Description.
The second link is Map Editor. This link will open the map in the Map Editor to start adding elements like countries, states, places, water, etc.

To edit the map in the Map Editor, click on the Map Editor link.
Edit the map in the Map Editor
The map will be opened in the Map Editor.
If you used a template in the previous step you will see a map with the countries of the template. Otherwise you will see an empty map. Countries that are added from the template will all be inactive. You have to select the countries that you want to use in the exercise and set them to Active in the properties pane.
In the following explanation we will create a sample map of the State of California with the neighbouring states Nevada, Oregon and Arizona. We will also add the capital cities of those states.
The different parts of the Editor
The Map Editor consists of three main parts:
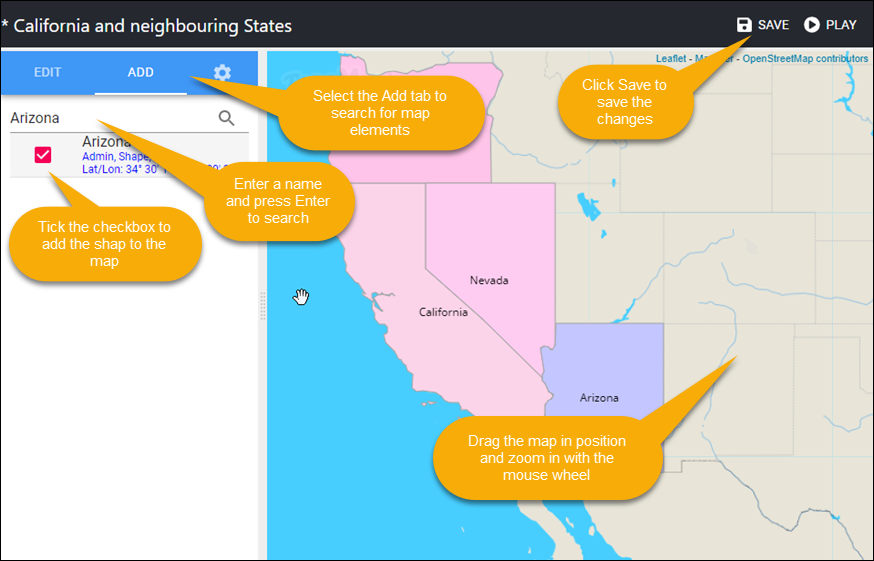
- At the top you have the Topbar with the name of your map and a Save button. Next to the Save button is the Play button to test your map.
- At the left there is a Sidebar with three Tabs on it. Here you will add and edit the elements of the map. The most right tab is the Settings tab which will be explained later on.
- The Center part of the Editor is your map with the added elements. You can reposition the map by dragging with your mouse. You can zoom the map with the mouse wheel.
Adding new elements to the Map
In the Sidebar there are three tabs: Edit, Add and Settings. To add new elements select the Add tab.
Enter "California" in the search field and press Enter. California will be shown in the results list with a checkbox in front. Tick the checkbox to add the shape to the map.
Use the mouse to drag the USA to the center of the map and use the mouse wheel to zoom in.
Now search for the neighbouring states Oregon, Nevada and Arizona and add them to the map by ticking the checkbox.

When your search shows no resultsRemember that searches are done in the Map Language that you chose when you created the map. So first check that you are searching with the right language. Also make sure you use the correct spelling. TopoMania uses the prefered spelling from the Wikipedia. Check your spelling by searching in the Wikipedia. |
Next we will add the Captial cities of the four states. For California this is Sacramento, for Oregon Salem, for Nevada Carson City and for Arizona Phoenix.
So Enter these names one by one in the search box and add the cities to the map by ticking the checkbox. The cities will be added as black dots.
Sometimes you will get multiple results for a search. For example, when you search for Salem, you will get multiple results. Check the details of the results to decide which item you need. The details will show you the type of result, the country and the coordinates. You can also tick the results one by one to see where the place is located.
When you have addes the four captials save the map by clicking the Save link in the Topbar.
Edit the Map Elements
Once you have added the shapes and points on the map, you can change the properties of these elements on the Edit tab of the Sidebar. Click on the Edit tab.
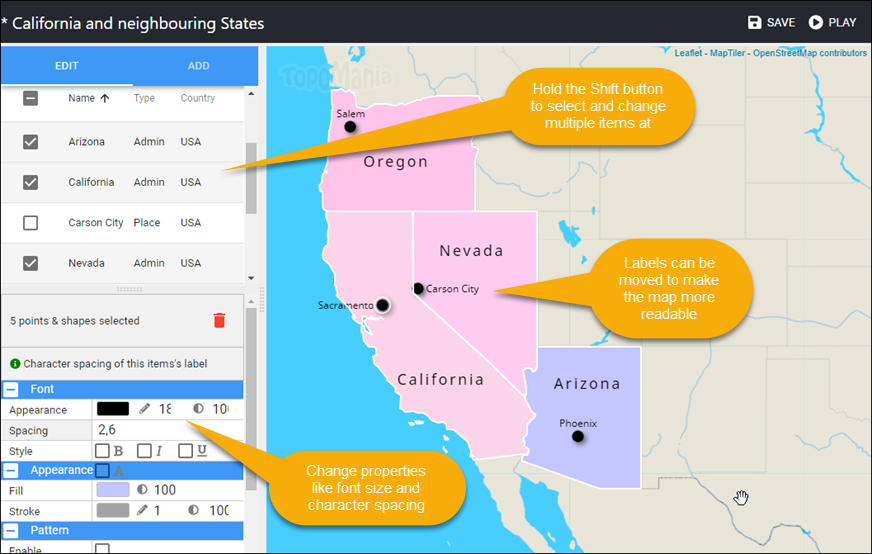
Select an item on the map or in the list. You will now see a property grid with the properties of the selected item. If you want to change multiple items at once, hold the Shift button and select het items you want to change.
Let's change the font of the labels of the States. Select the four states by clicking and holding the Shift button.
Now change to font size and make it bigger. You might also want to change the character spacing to make the label different from the cities.
If labels overlap or are to near to eachother, you can change the position. Labels of point can be positioned around the point. Labels of shapes can be freely moved by dragging with the mouse.

There a many more map item properties that can be changed. You can change colors, symbols, font styles and names. Some properties apply to both points and shapes, others only to points or only to shapes.
Below you find a list with all the properties with an explanation and usage.
| Label | ||
| Text | The text of the label. This text can be changed if needed. | Points and Shapes |
| Suffix | This is a word to show next to the name while playing. Sometime you may need to make a differentiation between to elements with the same name. For example when a country or state has the same name as a city. In this case you can put "City" as suffix to the name of the city. | Points and Shapes |
| Phonetic | When doing exercises with the map, the names of the map elements can be read aloud by an automated voice. When the pronounciation of a label is off, you can enter a phonetic alternative to make the text sound right. | Points and Shapes |
| Position | The position of a point label, relative to the point on the map. | Only points |
| Font | ||
| Appearance | The appearance of a label. Color, size and opacity. | Points and Shapes |
| Spacing | The character spacing of a label. | Points and Shapes |
| Style | The font style of a label. B = Bold, I = Italic, U = Underline, A = Captials. | Points and Shapes |
| Appearance | ||
| Symbol | The symbol of a point element. The scale can be changed to enlarge or shrink the symbol. | Only Points |
| Fill | The fill of a shape or point. Color and opacity. | Points and Shapes |
| Stroke | The stroke of a shape or point. Color, stroke width and opacity. | Points and Shapes |
| Pattern | ||
| Enable | A checkbox to enable or disable the pattern of a shape. | Only Shapes |
| Stripe 1 | Color, stroke width and opacity of the first stripe of the pattern. | Only Shapes |
| Stripe 2 | Color, stroke width and opacity of the second stripe of the pattern. | Only Shapes |
| Rotation | De rotation of the two stripes of a pattern in degrees. | Only Shapes |
| Exercise | ||
| Active | Items can be Active or not. Active items will be used in the exercise. Items that are not active will not be used in the exercise. | Points and Shapes |
Default values of properties
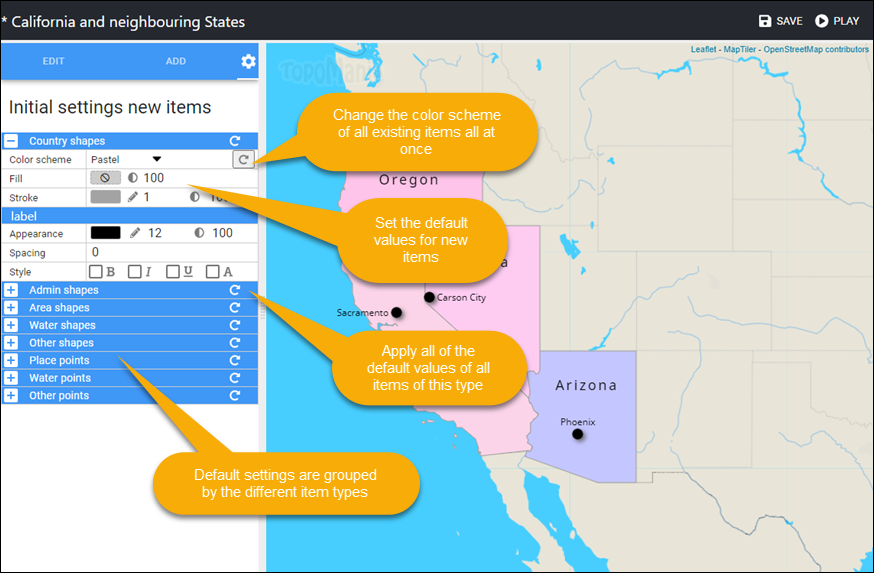
On the third tab in the Sidebar you find the default values of the properties of map elements. These defaults are grouped by item type, like Countries, Administrative areas, Water, Places, etc.
The values will be applied to new shapes and points that you add to the map. But you can also change the values of existing items on the map by clicking the refresh button next to the groups. This way you can quickly change the appearance of all the items on your map. This can make your map more consistent and easier to use for yourself or your students.
